Building Custom Form Selection Blocks - no JS, all CSS

I apologize for what may be a slightly misleading title. The topic for this post is something I've had on my list of things to explore for some time now, and while I wait for the new job to start, I've found myself with time to kill. Let me explain what I'm talking about and hopefully it will make a bit more sense. You are, dear reader, familiar with form controls and how to build forms both big and small. One type of user interface I've seen from time to time is the ability to select an item where the "item" is an arbitrary block of code. What do I mean by that?
Typically a choice element in a form is either a select, checkbox, or radio set. But I've seen some forms where you select something a bit more abstract. Consider the screen shot below:

See the two regular text fields and the cat selection? If I pick one, it visually updates:
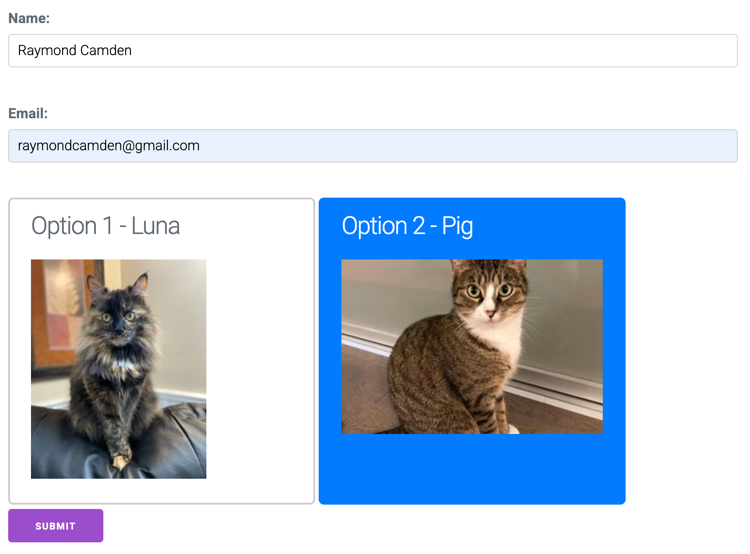
On submitting the form, there will be something representing the selected value, along with any other form field values as well. In theory, the "thing" you select can be any arbitrary block with the selection look and feel being whatever makes sense for your site.
So given this UX, I was curious how I'd build it myself.
First thought - Web Components
Initially, I thought this would be a great use for web components. Web components can participate in forms (see my post from... wow, three years ago!) so in theory, I could build something like this:
<form method="post">

	<p>
	<label for="name">Name:</label>
	<input type="text" name="name" id="name">
	</p>
	<p>
	<label for="email">Email:</label>
	<input type="email" name="email" id="email">
	</p>

	<area-select name="foo" value="1">
		This is area select 1.
	</area-select>

	<area-select name="foo" value="2">
		This is area select 2.
	</area-select>

	<input type="submit">
</form>
In the sample code above, area-select is a web component which will participate in a form by setting the foo value to whatever is selected, using the string in value as the value.
I wrote this out and was about to start hacking away at the code. Because of course JavaScript would be needed for this, right?
Sorry I doubted you CSS...
Before I started writing JavaScript, I thought - let me Google some more and research this because maybe, just maybe, a pure CSS solution would work?
I'm glad I did.
Turns out - it's actually relatively simple to achieve this with a bit of CSS. First, let's consider this version of the HTML:
<form method="post" action="https://postman-echo.com/post">

	<p>
		<label for="name">Name:</label>
		<input type="text" name="name" id="name">
	</p>
	<p>
		<label for="email">Email:</label>
		<input type="email" name="email" id="email">
	</p>

	<label class="custom-card">
	  <input type="radio" name="option" value="1">
	  <h3>Option 1 - Luna</h3>
	  <img src="https://placecats.com/200/250">
	</label>

	<label class="custom-card">
	  <input type="radio" name="option" value="2">
	  <h3>Option 2 - Pig</h3>
	  <img src="https://placecats.com/300/200">
	</label>

	<p>
	<input type="submit">
	</p>
</form>
My two "custom selectable doohickies" are just label elements with an internal radio button. After the button I've got arbitrary HTML.
Now for the CSS:
.custom-card input[type="radio"] {
  position: absolute;
  opacity: 0;
  width: 0;
  height: 0;
}

/* Style the label container itself as the button */
.custom-card {
  display: inline-block;
  padding: 12px 24px;
  border: 2px solid #ccc;
  border-radius: 6px;
  cursor: pointer;
  transition: all 0.2s ease;
  width: 350px;
  height: 350px;
  vertical-align: top;
}

/* Style change when active */
.custom-card:has(input[type="radio"]:checked) {
  background-color: #007bff;
  color: white;
  border-color: #007bff;
}
This does a few things. It completely hides the radio field, styles the label like a "card" element, and defines the "selected" look to add a blue border and background. It also swaps out the text color to white. Because I'm wrapping everything in a label, the entire block is selectable, and a cursor pointer helps make that clear to the user.
In theory... that's it. I spent a bit of time tweaking the initial CSS I had found and more could be done of course, but this ended up being simpler than I imagined.
You can play with the full demo here: https://capital-wood-marlin.codepen.app/
And here's the full CodePen:
See the Pen Custom Radio by Raymond Camden (@cfjedimaster) on CodePen.