Using Auth0 Login with JavaScript - Some Tips

Despite having worked at Auth0 a few years back, I never actually used their main identity product. (When I was there, I was part of a team working on a serverless offering.) It's been in the back of my mind to try the product for some time now, but I never got around to it. This past week Adobe was shut down for the holiday so with a lot of free time, I decided I'd finally give it a shot. I got something working, but had some troubles with their documentation so I figured I'd share what I ran into, and some code as well in hopes it will be helpful for others.
The Quickstart - Issue One
Ok, this all began when I used the JavaScript quickstart as my guide. I wanted something that wasn't framework-specific and was as simple as possible. I will say I completely missed the "this is a beta" warning on top, but I've left some feedback via their forums and other means. Most of what I found could be fixed with a bit more documentation, but there's one issue that completely breaks things. I'll do my best to make that clear in the text below.
Outside of the issues, the quickstart is rather well done. I especially like how it offers to set stuff up for your code right in the guide:

However, if you use this option, it creates the application with one setting misconfigured. Go ahead and let the tutorial create the application, but then go into the dashboard in another tab, open the Applications panel and select your new application. (It will probably be the only one.) You should be in the Settings panel and if you scroll down to Application properties, look for Token Endpoint Authentication Method:

See that yellow warning there? When I was going through the quickstart I wasn't able to log in, randomly came in here, noticed that, and figured, ok, let's change it. Change it to "None", save, and you'll notice it's now disabled:
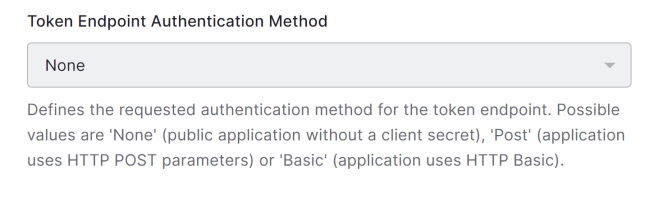
I assume it can be re-enabled if you tweak other settings, but all I know is that it was enough to get my demo code working.
The Quickstart - Issue Two
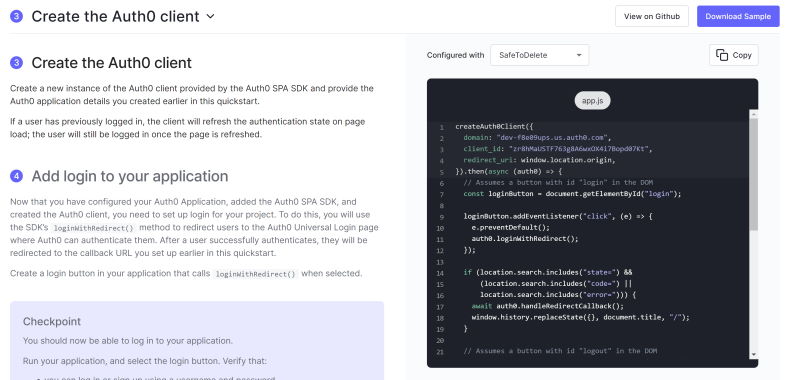
The second issue I ran into was 100% my fault, but with the assumption that other folks may make the same mistake, I figured I'd share. As you scroll down the quickstart, the content on the right-hand changes. This is super obvious to everyone. I assume. But I was on step three and stuck as the text didn't explain what to do:

Turns out - I just needed to scroll a bit more:
Yeah... I should have noticed that but as I said, if you're like me, don't repeat this mistake.
The Quickstart - Issue Three
The third issue I will bring is more generic and can be fixed by fleshing out the docs a bit - but after step three, things get a bit vague. So for example, in step four, they ask you to add a login button, but they don't mention that the default code shown previously requires a login button with a particular ID. Also a logout button. Also a div for the profile. If you are like me and test after every code change, this will throw you.
Specifically this is enough:
<button id="login">Login</button>
<button id="logout">Logout</button>
<div id="profile"></div>
And in fact, this is where the tutorial falls apart for me. I went ahead and downloaded the sample and... well, ok, soapbox coming. The "vanilla" JS example makes use of Node, docker, has a package.json, etc. And... to be clear, there's nothing at all wrong with all of that but my god, all of this could be done in one page (as I'm about to show!), and while all of those technologies are fine (I use Node every day), if you don't need them to illustrate a point, don't use em!!!
Wow, three exclamation marks. I need to chill for a sec:

A Demo
Alright, so despite running into issues, I can say when I got it all figured out, I was able to implement login in a simple, one-page application. I took their code and modified things a bit to make it a bit more ready for production. For example, I now show/hide the login and logout buttons depending on the login state. I also run the code in DOMContentLoaded as you would typically do. Here's a complete example, and yes, normally you would want the JavaScript in its own file, but as I said, I was looking for a simple example:
<!DOCTYPE html>
<html lang="en">
<head>
	<meta charset="utf-8">
	<title>Simple Demo is Simple</title>
	<style>
	</style>

</head>
<body>

<h1>Simple Demo is Simple</h1>

<button id="login" style="display:none">Login</button>
<button id="logout" style="display:none">Logout</button>
<div id="profile" style="display:none"></div>

<script src="https://cdn.auth0.com/js/auth0-spa-js/1.20/auth0-spa-js.production.js"></script>
<script>

let loginBtn, logoutBtn, profileDiv;
let auth0Client;

document.addEventListener('DOMContentLoaded', init, false);

async function init() {
	loginBtn = document.querySelector('#login');
	logoutBtn = document.querySelector('#logout');
	profileDiv = document.querySelector('#profile');

	auth0Client = await createAuth0Client({
		domain: "dev-f8e09ups.us.auth0.com",
		client_id: "V4Yv7D5cQNb5NEbBjXzPqNELoDB2JVsI",
		redirect_uri: window.location.origin,
	});

	// handle coming back from login
	if (location.search.includes("state=") &&
		(location.search.includes("code=") ||
		location.search.includes("error="))) {
		await auth0Client.handleRedirectCallback();
		window.history.replaceState({}, document.title, "/");
	}

	const isAuthenticated = await auth0Client.isAuthenticated();
	console.log('isAuthenticated', isAuthenticated);

	if(!isAuthenticated) loginBtn.style.display = '';
	else {
		logoutBtn.style.display = null;
		const userProfile = await auth0Client.getUser();
		profileDiv.innerHTML = `<h2>Profile</h2><pre>${JSON.stringify(userProfile,null,'\t')}</pre></div>.<p><img src="${userProfile.picture}" /></p>`;
		profileDiv.style.display = '';
	}

	loginBtn.addEventListener("click", e => {
		e.preventDefault();
		auth0Client.loginWithRedirect();
	});

	logoutBtn.addEventListener("click", e => {
		e.preventDefault();
		auth0Client.logout();
	});

}
</script>
</body>
</html>
If you've got any questions about the above, let me know. Note that you can use this code on multiple pages and it works as expected. By that I mean, if you are on index.html, log in, and then go to cat.html, and check login status, it will reflect that you are logged in. No need for a SPA - it just plain works.
As always, reach out if you've got a question about the above. This was done in preparation for another demo related to Twitter, and I got to say, the Auth0 experience of connecting a Twitter app to an app login was really well done!
Photo by Micah Williams on Unsplash