Integrate Your Netlify Builds with Tidbyt and Pipedream

A few months ago I randomly came across a Facebook app for a little device that looked completely unnecessary yet also completely cool: Tidbyt. The Tidbyt is a little hardware LED device that shows different pieces of data, for example, sunrise and sunset:

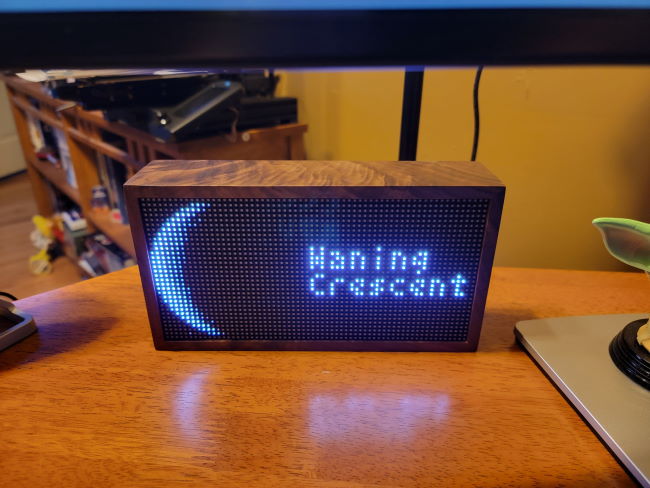
Or moon phase information:
And of course, Nyan cat:

As I said, this is not something I need in my life, but I'm so happy I got it. It's just a fun piece of hardware. But even cooler is that it's got an API. You can use the API to build full apps or just one-time messages. Their developer documentation is pretty well done, and while I ran into a hiccup or two, it was pretty easy to start sending custom messages to my hardware. The only real nit is that you must send a picture, a 64x32 image. That's kind of a bummer when you want to just send a quick text message, but there are multiple ways to generate images out there so it's not too much of a problem.
With that in mind - let me share how I built a Netlify integration!
What I'm Building
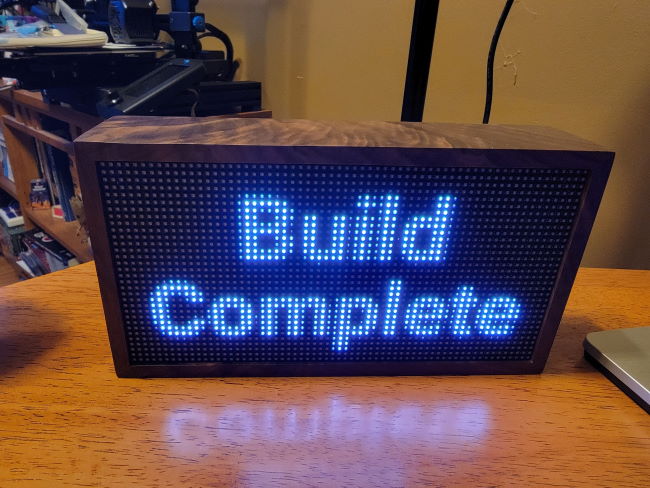
Short and simple - when I deploy my site (this site, the one you are on right now!), I want a notification when the build is complete. Something like so:
Netlify takes between two to four minutes when building my site, so this way I can get a visual notification when the build is done. Let me share how I did it.
The Pipedream Workflow
The main part of the process is a Pipedream workflow that uses an HTTP trigger. Essentially a simple serverless endpoint. Outside of the trigger is one code step. Now, here's where things got a bit complex. I knew I needed to generate an image with text. While I've done some work with Node libraries in the past to read and manipulate images, it's been a while since I had to use one. I also ran into an issue where the NPM modules I found didn't work well on Pipedream.
At first, I thought about using a placeholder image service. Many of them let you define an image with text on it, already centered, and while I struggled a bit, I did get something working there.
While chatting about this on the Pipedream slack, one of the members there recommended Bannerbear. This is a really cool image API service that has a very simple API. You design a base template using their web-based tools, and can then use an API to say, "Take this template, manipulate it, and return me the result."
Here's how I used it:
var data = {
    "template" : "V32jY9bBeN0DBGWrlo",
    "modifications" : [
    {
        "name" : "text_container_3",
        "text" : "Build Complete",
        "text_align_h":"center",
        "text_align_v":"center",
        "color" : "#FFFFFF",
    }
    ]
}

let resp = await fetch('https://sync.api.bannerbear.com/v2/images', {
    method: 'POST',
    body: JSON.stringify(data),
    headers: {
    'Content-Type' : 'application/json',
    'Authorization' : `Bearer ${process.env.BANNER_BEAR_API_KEY}`
    }
    });

let result = await resp.json();
As you can see, there isn't too much to it. I specify a template (which for me was just a black rectangle using the proper size for Tidbyt) and then the text I want to use. I send this to Bannerbear and the result is a JSON packet that includes the URL to the generated image. Now I want to be clear, Bannerbear has a heck of a lot of options, I just used the quickest and simplest thing I could to generate my image, but it's definitely a service to check out. Here's what that image looks like when done:

The next step was to get that data on my Tidbyt. As I mentioned, they have an API, but you can also find an NPM package: https://npm.io/package/tidbyt. Once installed, and with your keys setup in environment variables, it's pretty quick to use:
const tidbyt = new Tidbyt(process.env.TIDBYT_TOKEN);
const device = await tidbyt.devices.get(process.env.TIDBYT_DEVICE_ID);

let image = await fetch(result.image_url);
let img_data = await image.arrayBuffer();

await device.push(Buffer.from(img_data), {
    installationId:'Custom',
    background:false
});
Now... this was the first version and you probably noticed. I'm calling an API to generate a dynamic image... with static text. That's kind of dumb. So after I got it working, and sent Bannerbear a virtual high five, I stopped using their API and simply saved the image to my Pipedream workflow attachments. Now the code step is a bit simpler:
import Tidbyt from 'tidbyt';
import fs from 'fs';

export default defineComponent({
  async run({ steps, $ }) {

    const tidbyt = new Tidbyt(process.env.TIDBYT_TOKEN);
    const device = await tidbyt.devices.get(process.env.TIDBYT_DEVICE_ID);

    let img_data = fs.readFileSync(steps.trigger.context.attachments["build_complete.png"]);

    await device.push(Buffer.from(img_data), {
      installationId:'Custom',
      background:false
    });


  },
})
The Netlify Integration
The final step was to copy the URL from the Pipedream workflow and tell Netlify to hit it on a successful build. I went into my site's settings, Build & deploy, Deploy notifications. I added a new notification and selected the "deploy succeeds" notification. Lastly, I just pasted in my URL from Pipedream:

Wrap Up
As I said, I really like the hardware, and there are a lot of apps you can use with it. The API is nicely done and I could do something a lot more complex, but for a quick integration test, this simple workflow worked well. Let me know if you pick up the device and what you think.