Integrating Eleventy with GitHub Flat Data

This post was inspired by a follower on Twitter who saw this announcement by the GitHub folks:
Releasing our first public project to the world! From our team within GitHub that explores the future of development, we're excited to share:
— GitHub OCTO (@githubOCTO) May 18, 2021
✨✨ Flat Data ✨✨
We asked ourselves:
How easy can we make it to work with live-updating data?
Check it out!https://t.co/njLvo3CxNj pic.twitter.com/jBDnnUD4y3
They were curious how well it would work with Eleventy and specifically asked me if I could take a look. I spent some time playing with it and I have to say, I'm rather intrigued by it. Before I get to the Eleventy bits, let me back up a bit and explain what this whole Flat Data thing is about.
The Flat Data project is based on a simple idea. Many projects need to incorporate data from APIs in their projects, but don't necessarily need the most up to date version of that data. Flat Data lets your GitHub repository download data from an API and store it in your repository on a scheduled basis.
So imagine your project needs weather information from an API. Typically you would fetch that data using either server-side code or client-side code. Both of these may be problematic. The API may not support CORS which means client-side use will be off the table unless you create a serverless proxy of some sort. The API may have usage restrictions where you don't want to fetch the data too often.
Flat Data basically lets you take the result of the remote API and save it to your repository as if you had done it yourself. So for example, I can go to remote API in my browser, copy and paste the JSON and save it to a file, like data.json, and then check it in to my repository. Flat Data automates this.
It does this via GitHub Actions, a powerful feature added recently that lets you do CI/CD related things to your repository. The Flat Data action lets you specify an API to hit and even lets you execute a script to change that data.
It also makes use of a Visual Studio Code extension. I've never used GitHub Actions before but the extension made it brain-dead easy for me.
And that's basically it. The web site has pretty good docs and demos so check it out, but let me show how I used it in Eleventy.
For my demo, I used a free Weather API that doesn't require any kind of authentication. Here's the endpoint for weather for my hometown:
https://goweather.herokuapp.com/weather/Lafayette,LA
The result is pretty minimal:
{
  "temperature": "+33 °C",
  "wind": "8 km/h",
  "description": "Partly cloudy",
  "forecast": [
    {
      "day": "1",
      "temperature": "+31 °C",
      "wind": "10 km/h"
    },
    {
      "day": "2",
      "temperature": "+31 °C",
      "wind": "8 km/h"
    },
    {
      "day": "3",
      "temperature": "",
      "wind": "10 km/h"
    }
  ]
}
Thirty-three degrees? That's chilly! All kidding aside, note that it's in Celsius. We'll get to that in a moment.
So, the first thing I did was use the Visual Studio Code extension. It prompts you for a schedule (supporting both simple schedules and CRON):
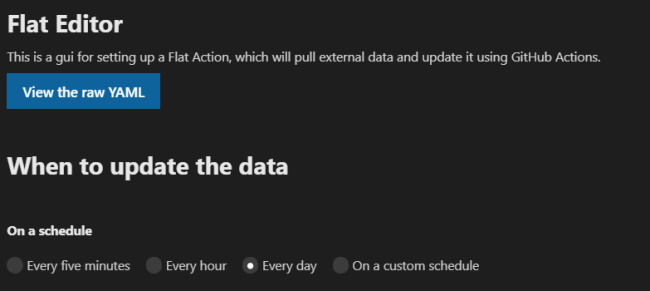
I selected every day as I figured that was appropriate for weather data. Next, you need to select your data source. This can be either HTTP or SQL. You'll be prompted for what URL to hit, where to save the data, and what post processing you need, if any.

In the screen shot above, you can see I've specified my API endpoint. I tell the action to store the result in Eleventy's _data folder. This means I can then access it in my templates. Finally, since I'm a crazy American and won't convert to metric until the end of time, I specified a post processing template.
This part was a bit weird as it has to use Deno, a new server-side JavaScript platform like Node, but it's not terribly different. I used some of the Flat Data's own sample code and modified it. Here's my post processor - it basically just rewrites the temperatures in Fahrenheit.
import { readJSON, writeJSON, removeFile } from 'https://deno.land/x/flat@0.0.11/mod.ts'

const filename = Deno.args[0];
const json = await readJSON(filename);
json.temperature = fixC(json.temperature);

json.forecast.forEach(f => {
	f.temperature = fixC(f.temperature);
});

console.log(json);

await writeJSON(filename, json);

function fixC(s) {
	let tempInC = s.split(' ')[0];
	return (tempInC * 1.8 + 32).toFixed(0);
}
Notice that I write the output back to the input file. In the examples I saw they wrote out to another file but my code worked fine. I suppose do what makes sense here.
Anyway, everything the extension does is written out to a file in .github/workflows called flat.yml. You can absolutely edit it by hand. Here's how mine looks:
name: data
on:
  schedule:
    - cron: 0 0 * * *
  workflow_dispatch: {}
  push:
    paths:
      - .github/workflows/flat.yml
      - fixweather.js
jobs:
  scheduled:
    runs-on: ubuntu-latest
    steps:
      - name: Setup deno
        uses: denoland/setup-deno@main
        with:
          deno-version: v1.x
      - name: Check out repo
        uses: actions/checkout@v2
      - name: Fetch data
        uses: githubocto/flat@v3
        with:
          http_url: https://goweather.herokuapp.com/weather/Lafayette,LA
          downloaded_filename: _data/weather.json
          postprocess: fixweather.js
I'm not a fan of YAML myself so I greatly appreciate having the visual editor instead.
Ok... so here comes the magic part. I say magic as I really haven't made much use of GitHub Actions yet. (I have a bit with Azure Static Web Apps, but a lot of that's hidden from you.) Once I committed my code... it just worked. (Ok, I lie, I ran into some issues, but they weren't things I think readers will run into so I'm not going to cover them here.) By just committing this file, my GitHub repository now will - on my schedule - run the action. It will do the HTTP, pass the result to my repository, then call my script, which then updates the JSON to use the right temperatures.
As I said, it's in _data, so for Eleventy... it just works:
<h1>Eleventy Testing Flat File</h1>

Weather in raw JSON:<br/>
<pre>
{{ weather }}
</pre>

<p>
Our latest temperature is {{ weather.temperature }} F with a forecast of: {{ weather.description }}.
</p>

<p>
Here's the forecast for the next three days:
</p>

<ul>
{% for report in weather.forecast %}
<li>Temperature of {{ report.temperature }} F.</li>
{% endfor %}
</ul>
You can see this live here: https://eleventy-flat.netlify.app/. The repository is here: https://github.com/cfjedimaster/eleventy_flat_data/actions
If you go to the repository, you can go to the Actions page and see the GitHub Action's history:

It's probably not clear, but the action runs on schedule and when I do my own commits, which I think is pretty cool. You can also click into each instance and get details. That helped a lot when I was having issues.
The final step was to setup a new Netlify site and tie it to this repo. When the GitHub Action runs, it counts as a commit and fires off the build on the Netlify site automatically.
Speaking of - it is possible to debug and test this stuff locally. Coming into Flat Data with no previous experience with GitHub Actions, I struggled with that somewhat. I posted on the Flat's projects discussion board and got some good feedback there: https://github.com/githubocto/flat/discussions/50. Check it out if you want some detail on that.
Photo by Martin Sanchez on Unsplash