Playing with StrongLoop - Building a Blog - Part Two
Welcome to the next blog entry in my series describing building a real (kinda) application with StrongLoop. In the last entry, I talked about the application I was creating (a simple blog), built the model, and demonstrated how to work with the model on the server-side. I completely skipped over using the REST APIs to focus on a simple content-driven dynamic site.
In this post, I'm going to cover how I can lock down those APIs. This is in preparation for working on an admin for the blog in a later post. This post will be a bit short as this a topic I covered in depth a few months ago (Working with StrongLoop (Part Four) – Locking down the API), but I wanted to discuss the topic again to call out a few things I missed last time. I suggest reading that earlier post to give some additional context to what I'm describing below.
So first off - out of the box your models are completely CRUDable (create/read/update/delete) via the REST API. This is handy, but of course you want to lock down these APIs so folks don't pepper your site with SEO spam.
As I discussed in my earlier post, locking down your API is as simple as using slc loopback:acl. Here is an example:
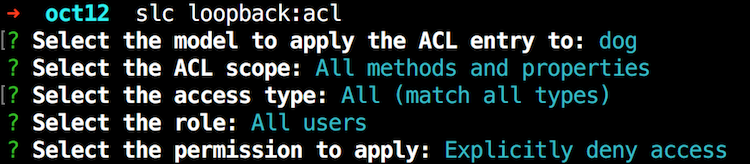
In the end, the CLI simply updates the model's JSON definition file. In general, the lock down process is:
- Block everything!
- Allow anon folks to read
- Allow auth users to write
Here is how this looks in JSON:
"acls": [
   {
      "accessType": "*",
      "principalType": "ROLE",
      "principalId": "$everyone",
      "permission": "DENY"
    },
    {
      "accessType": "READ",
      "principalType": "ROLE",
      "principalId": "$everyone",
      "permission": "ALLOW"
    },
    {
      "accessType": "WRITE",
      "principalType": "ROLE",
      "principalId": "$authenticated",
      "permission": "ALLOW"
    }
Of course, this assumes a security model where every logged in user is an admin. More complex apps will probably have different roles associated with users. So in a blog, you may have users who can write content, but only some who can publish content so that the entry is publicly readable. For now I'm sticking with the simple system of allowing logged in users full power.
I did this for both entry and category. Remember, these are the primary model types for my blog.
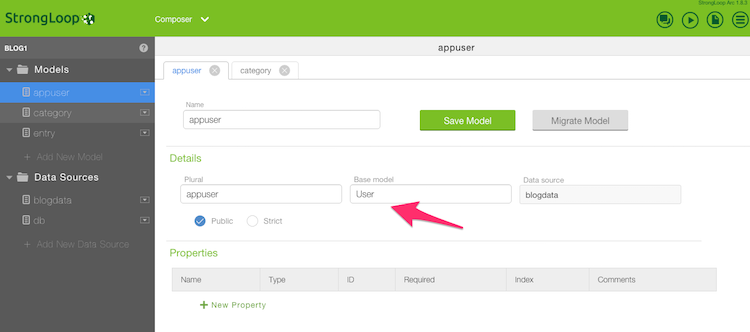
I then created a new model called appuser. Again, I discussed this in the previous entry, but while Loopback has a core User object, it is strongly suggested you extend this type into your own for your application. One thing I didn't demonstrate in the previous post was how this was done in the Composer app. It is a simple matter of making a new type and changing Base model to User.
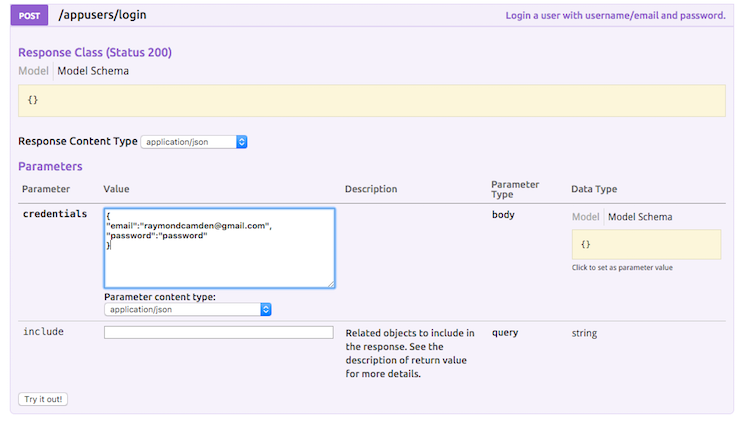
Next I needed to test this. Again, I mentioned in the other post about how you can use the web-based Explorer to login, but it occurs to me that I didn't actually show how that is done. Login is just another REST method! If you select your user type, you can scroll down to a login method. You then need to enter a JSON object containing your credentials.
After you login, make note of the response. The ID contains a token:
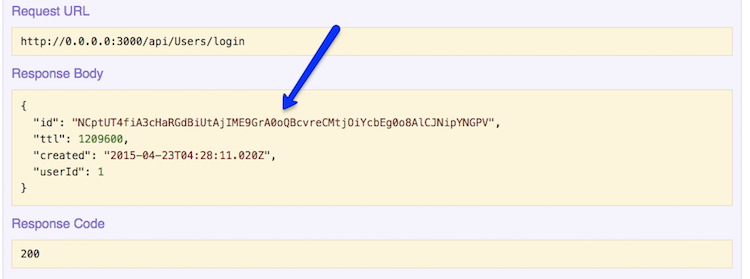
(Image taken from StrongLoop docs: Introduction to User model authentication)
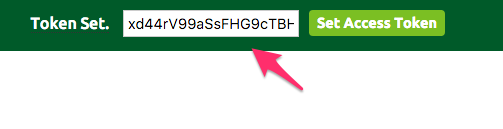
You take that and then paste it into the token field on top of the explorer.
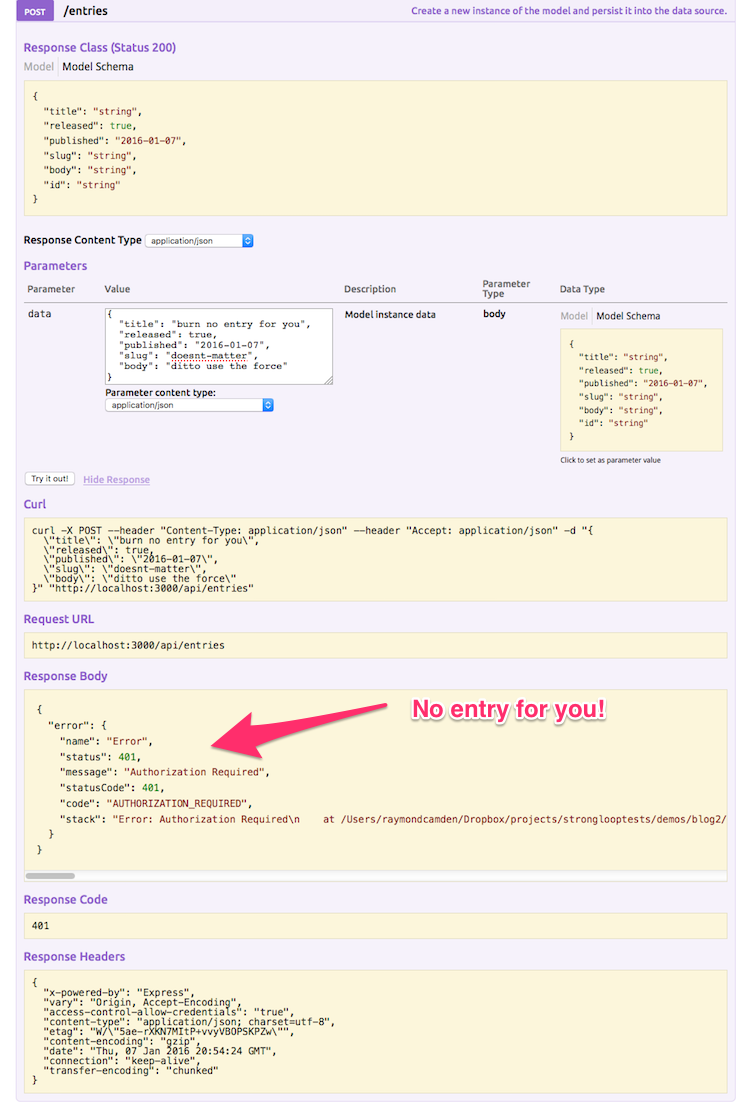
This ensures your later calls via the explorer are authenticated. To be sure, I tested posting a new entry before being logged in:
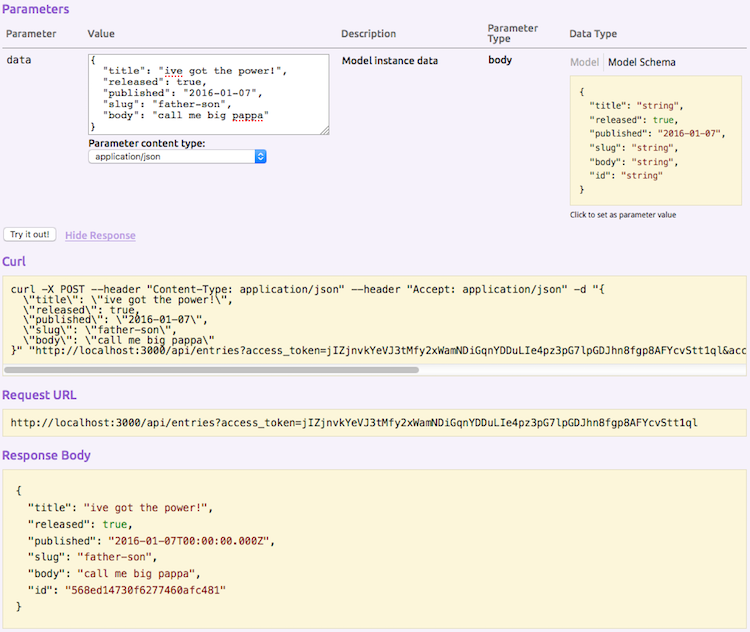
Then I confirmed I could create after logging in:
I bet your curious about the server-side API. Is it impacted by ACLs? Nope. I guess that's expected, but I was curious. Basically your Node.js code executes like a root user.
The updated version of the code can be found here: https://github.com/cfjedimaster/StrongLoopDemos/tree/master/blog2.