Working with StrongLoop (Part Four) - Locking down the API
Welcome to the latest in my series of blog posts on the StrongLoop platform. The last few blog posts have been focused on the API composer (part of StrongLoop Arc) built on top of LoopBack. As I've mentioned, there is a lot more to StrongLoop then just the API stuff and I plan on moving to those other topics soon. For today I'm going to discuss how you can lock down your API. Out of the box, all your models (and APIs) are 100% open. That makes it incredibly easy to quickly prototype and test adding, editing, and deleting data. But in a real application, you'll obviously want to lock down how folks can use your API. As before, the StrongLoop folks do a good job documenting this area: Authentication, authorization, and permissions. The focus of this entry is to summarize those docs and discuss some of the things that confused me personally.
Ok, so let's begin by talking about the security model at a high level. Security rules are defined at the model level (although you can also apply security to all models). You can apply a rule to a model method or property that sets an access value for a particular user. In terms of users, you can specify a specific user, or more likely, a role instead. LoopBack has various roles built in, like $owner, $authenticated, $unauthenticated, and $everyone. These are referred to as ACLs (Access Control Lists) and you can see them within a model definition.
The StrongLoop Arc Composer does not support visually defining ACLs so you have to either type them by hand, or use the command line. The actual definition is really simple so once you've done it a few times you can probably skip the CLI, but the CLI isn't too hard to use.
If you remember my previous blog posts, I defined a "Cat" and "Dog" model for my application. To test security I decided to lock down access to Dogs. My thinking was this:
- Anyone can get dogs, or an individual dog.
- Only logged in users can modify dogs.
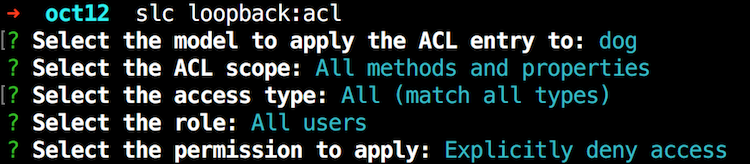
That's a fairly simple design and doesn't support the idea of different types of users. LoopBack definitely supports that but I wanted to keep it as simple as possible. I followed the guide (Controlling data access) and began by locking down all access to the Dog API:
Next, I wanted to add anonymous access to get dogs and an individual dog. Here is where things get weird. When using the CLI, the prompt will ask if you want to modify access to a property or method. In my case I wanted to enable the REST API to let me read dogs. However, when you look at the API explorer, this is what you see:

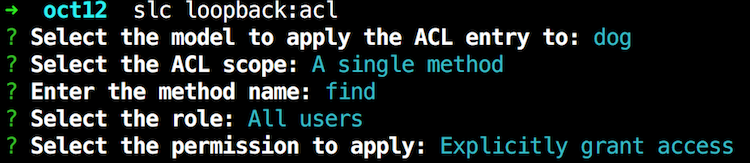
Getting all dogs corresponds to GET /dogs and getting one dog corresponds to GET /dogs/ID. But that is not what LoopBack wants in the ACL. Instead it wants find and findById. Ok, that kinda makes sense, but I was not able to find a good table that maps the REST APIs to various internal LoopBack methods. You'll have to figure these out one by one I suppose (and remember it of course ;). So here I am adding support for running find for anonymous users:
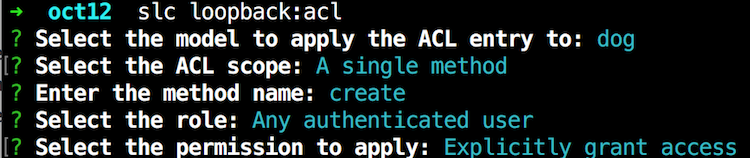
And I simply did this again for findById. Finally, I added support for making new dogs:
The CLI is easy to use, but check out the Dog model. As you can see, these ACLs aren't too complex. I think after you've used the CLI a few times you won't need to generate them via the CLI.
{
  "name": "dog",
  "base": "PersistedModel",
  "strict": false,
  "idInjection": false,
  "options": {
    "validateUpsert": true
  },
  "properties": {
    "name": {
      "type": "string",
      "required": true
    },
    "gender": {
      "type": "string",
      "required": true
    },
    "color": {
      "type": "string",
      "required": true
    }
  },
  "validations": [],
  "relations": {},
  "acls": [
    {
      "accessType": "*",
      "principalType": "ROLE",
      "principalId": "$everyone",
      "permission": "DENY"
    },
    {
      "accessType": "EXECUTE",
      "principalType": "ROLE",
      "principalId": "$everyone",
      "permission": "ALLOW",
      "property": "find"
    },
    {
      "accessType": "EXECUTE",
      "principalType": "ROLE",
      "principalId": "$authenticated",
      "permission": "ALLOW",
      "property": "create"
    },
    {
      "accessType": "EXECUTE",
      "principalType": "ROLE",
      "principalId": "$everyone",
      "permission": "ALLOW",
      "property": "findById"
    }
  ],
  "methods": {}
}
Woot! Ok, so how do you test? Again, the docs do a good job of walking you through this. Start here, Introduction to User model authentication, and just follow the directions to create a User via the REST API. Here is what confused me though.
When you create your user, you'll specifically want to use the email property and password property. They document this (image stolen from their docs):
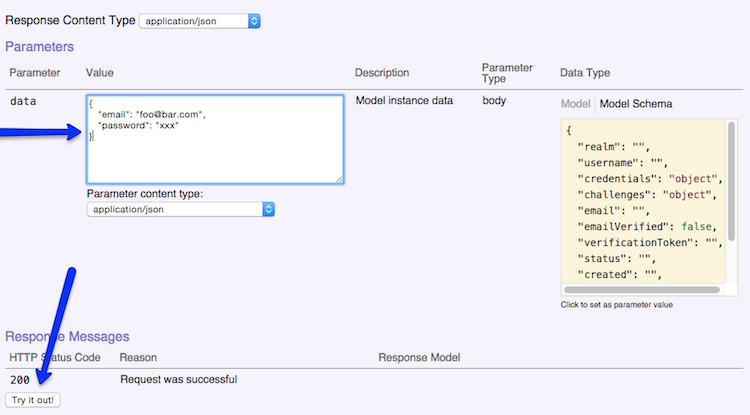
But I was confused since the password field as an argument does not map to a password property (that you can see on the right hand side). Also, I wondered they used email instead of username. In the end, I just used what they demonstrated and it worked.
Once you've made a user, you can login, get an application token, and then run your locked down methods in the API explorer. It just works... until you restart. By default, the User model is stored in the in-memory database. As a reminder, if you go to your server folder and open model-config.json, you can see this for yourself:
{
  "_meta": {
    "sources": [
      "loopback/common/models",
      "loopback/server/models",
      "../common/models",
      "./models"
    ],
    "mixins": [
      "loopback/common/mixins",
      "loopback/server/mixins",
      "../common/mixins",
      "./mixins"
    ]
  },
  "User": {
    "dataSource": "db"
  },
  "AccessToken": {
    "dataSource": "db",
    "public": false
  },
  "ACL": {
    "dataSource": "db",
    "public": false
  },
  "RoleMapping": {
    "dataSource": "db",
    "public": false
  },
  "Role": {
    "dataSource": "db",
    "public": false
  },
  "cat": {
    "dataSource": "mysqldb1",
    "public": true,
    "$promise": {},
    "$resolved": true
  },
  "dog": {
    "dataSource": "mysqldb1",
    "public": true,
    "$promise": {},
    "$resolved": true
  },
  "quickmysqltest": {
    "dataSource": "mysqldb1",
    "public": true,
    "$promise": {},
    "$resolved": true
  },
  "appuser": {
    "dataSource": "mysqldb1",
    "public": true,
    "$promise": {},
    "$resolved": true
  }
}
I first attempted to move User to the MySQL datasource I created. In the web-base Arc Composer, they hide the "built in" models so you can't just migrate User. I tried to just set it in the JSON file, but then ran into the issue where the appropriate tables weren't made. You can do migration via JavaScript code, and I was beginning to work on that, until I discovered this nugget in the docs:
The User model represents users of the application or API. Typically, you'll want to extend the built-in User model with your own model, for example, named "customer" or "client".
Oh, that's easy. So back in Arc Composer I made a new model called appuser, told it to extend User, and pointed to the MySQL datasource, and bam, that was it. I had my own user system with persistence. That was freaking cool as heck.
So, that's it. Well, I mean that's it for my look at the API stuff. I'm going to work on a blog post that summarizes all of this and brings in Ionic to demonstrate. Look for that later this week.