ColdFusion 10 Image Updates
ColdFusion 10 provides a few updates to image handling that may be useful to folks. Here's a brief run down of what's new in ColdFusion 10 and image handling.
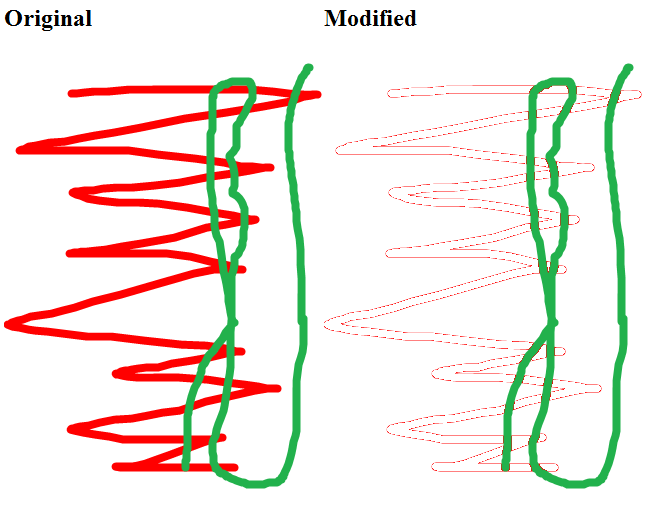
The first feature I'll demonstrate is imageColorTransparent. This takes an image and a color and returns a new image with said color now transparent. So for example:
<cfset img = imageRead("untitled.png")>
<div style="float:left">
<h2>Original</h2>
<cfimage action="writeToBrowser" source="#img#">
</div>
<cfset img2 = imageMakeColorTransparent(img,"##ff0000")>
<div style="float:left">
<h2>Modified</h2>
<cfimage action="writeToBrowser" source="#img2#">
</div>
Nice and simple right? Here's the result:
The next function we'll look at is imageMakeTranslucent, which, as you can probably guess, makes an image more transparent. Here's an example:
<div style="float:left">
<h2>Original</h2>
<cfimage action="writeToBrowser" source="#img#">
</div> <cfset img2 = imageMakeTranslucent(img,"50")> <div style="float:left">
<h2>Modified</h2>
<cfimage action="writeToBrowser" source="#img2#">
</div>
<cfset img = imageRead("thorshark.jpg")>
The function takes in an image as the source and a number from 0 to 100 for how translucent to make it. Here's the result:

Another new function provides support for creating CAPTCHAs via cfscript:
<cfimage action="writeToBrowser" source="#cImage#">
<cfscript>
//also supports font/fontsize
cImage = imageCreateCaptcha(50, 200, "Beer","medium");
</cfscript>
We all know what CAPTCHAs look like so I won't bother sharing a screen shot. Now for something pretty darn cool. One of the issues with image manipulation is handling dynamic text. ColdFusion made it easy to write dynamic text on an image, but wasn't easy was determining if the text actually fit on the image. (This is one of the things the open source ImageUtils project at RIAForge handles.) ColdFusion 10 now lets you get information about text written to an image. Consider this code:
<cfset res = imageDrawText(img, "My name is Tron", 0, 0, {size:12,style:"bold"})> <cfdump var="#res#" label="12, bold"> <!--- slightly bigger... --->
<cfset res = imageDrawText(img, "My name is Tron", 0, 0, {size:13,style:"bold"})> <cfdump var="#res#" label="13, bold"> <!--- back to 12, but not bold --->
<cfset res = imageDrawText(img, "My name is Tron", 0, 0, {size:12})> <cfdump var="#res#" label="12, non bold">
<cfset img = imageNew("",300,300)>
You can see we've got 3 different types of text. The actual text is the same, but the display is different because of the font attributes. Here are the results:

As expected, changes to bold attributes impact the size. Now, there's one thing to keep in mind. To use this new feature you have to actually draw out the text. In a real application, I'd consider using a blank canvas like I did above and not writing on a real file. So given a banner of a certain width and height, simply make a new one with the same size (totally virtually, not store on disk), write the dynamic text and see if it fits, and if so, then read in the real image, do your write, and save that version.
Another update is to imageOverlay. You can supply both a rule and an alpha to the overlay. In the past, there were no options at all. For an example of the rules, see Compositing Graphics. I've also included a sample in the zip file attached to this blog entry.
So what else changed? The cfimage/captcha option tag can now return it's data into a variable. Useful if you need to store the CAPTCHA in a variable. The cfimage tag also supports interpolation attributes for resize actions.
Another cool change - if you don't specify a font for the CAPTCHA tag/function, ColdFusion 10 will now fallback to a default font instead of throwing an error. This makes it easier to write code that will work across multiple systems.
All code from this blog entry is available via the download link below. Enjoy.
Edited at 7:50AM: Just a quick note. One of the Adobe engineers, Chandan Kumar, shared an interesting fact about imageMakeColorTransparent. You can actually run it multiple times to make multiple colors transparent. Ie:
<cfset img = imageMakeColorTransparent(img,"##EC1C24")>
<cfset img = imageMakeColorTransparent(img,"##EC1F26")>
<cfset img = imageMakeColorTransparent(img,"##ED2931")>
<cfset img = imageMakeColorTransparent(img,"##EC1D25")>
<cfset img = imageMakeColorTransparent(img,"##EC1E26")>
<cfset img = imageMakeColorTransparent(img,"##EC1F27")>
<cfset img = imageMakeColorTransparent(img,"##EC1B23")>
<cfset img = imageMakeColorTransparent(img,"##F1545A")>
<cfset img = imageMakeColorTransparent(img,"##F2555B")>
<cfimage action="writeToBrowser" source="#img#">