ColdFusion 8: AJAX UI Layouts
Today I begin a series of blog posts looking at the new AJAX UI elements in ColdFusion. Let me start off by saying that when I first discovered that ColdFusion would be shipping UI elements I was a bit.... wary. I mean - how many of you are using CFTABLE? The only real success ColdFusion has had in UI elements is Flash Forms... which frankly are dead to me now that I can use Flex 2 for free. So I think I'm being quite honest when I say I didn't have high expectations when I first started to dig into these features. After playing with them though I'm beginning to really like them. Let's start with the simplest of the UI controls - the layouts.
ColdFusion ships with two tags that I will be focusing on tonight - cflayout and cflayoutarea. These tags have multiple uses, but I'll be focusing on the border type. The border type acts a lot like frames. Everyone remember frames? If you are new to the whole web thing then you may have missed out on them. They rose to popularity quickly and then dropped out of usage almost as quickly. A few places still use them. A good example of this is the ColdFusion Administrator. Speaking personally - I haven't used frames for a while. I did use them for SpoolMail. It seemed to make sense for the application. I think the same applies to the border layout controls. While I wouldn't build a blog with them, I could see them being very useful AJAX style applications, or RIAs in general.
So enough pontificating. Let's look at some code. At a base level, you begin your border layout by wrapping your content with cflayout:
<cflayout type="border">
</cflayout>
You now have the option to place 5 different items. These items are all placed in one of the following positions: top, bottom, left, right, center.
So consider a simple example:
<cflayout type="border">
<cflayoutarea position="top" title="Top Layout Area">
This is the top layout area.
</cflayoutarea>
<cflayoutarea position="center">
This is the center layout area.
</cflayoutarea>
</cflayout>
In this example I've added two cflayoutareas. One on top, with a title, and one in the center position. The center position isn't allowed a title. When you do use a title in the cflayoutarea, it adds a graphical header to the section. Want to add another section? Just add it and specify a position:
<cflayout type="border">
<cflayoutarea position="top" title="Top Layout Area">
This is the top layout area.
</cflayoutarea>
<cflayoutarea position="center">
This is the center layout area.
</cflayoutarea>
<cflayoutarea position="bottom" title="Bottom Layout Area">
This is the bottom layout area.
</cflayoutarea>
</cflayout>
Here is a screen shot of how this looks:

Want to get crazy? Add a left and right layoutarea as well:
<cflayout type="border">
<cflayoutarea position="top" title="Top Layout Area">
This is the top layout area.
</cflayoutarea>
<cflayoutarea position="center">
This is the center layout area.
</cflayoutarea>
<cflayoutarea position="bottom" title="Bottom Layout Area">
This is the bottom layout area.
</cflayoutarea>
<cflayoutarea position="left" title="Left Layout Area">
This is the left layout area.
</cflayoutarea>
<cflayoutarea position="right" title="Right Layout Area">
This is the right layout area.
</cflayoutarea>
</cflayout>
Which results in this:

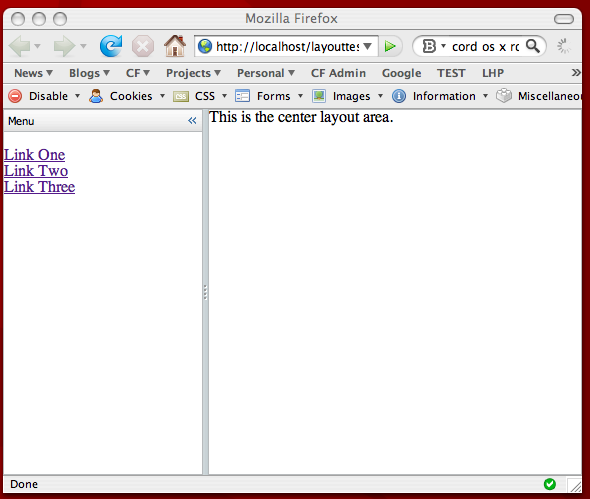
The layoutareas that surround the center have numerous options. You can set an initial size. You can set a max and min size. You can even allow them to be collapsed or even closed. Most of these options require the splitter attribute to be true. This creates a "grippable" handle that lets you change the size of the area. Consider this example:
<cflayout type="border">
<cflayoutarea position="center">
This is the center layout area.
</cflayoutarea>
<cflayoutarea position="left" title="Menu" splitter="true" collapsible="true" size="200" maxsize="200">
<p>
<a href="">Link One</a><br />
<a href="">Link Two</a><br />
<a href="">Link Three</a><br />
</p>
</cflayoutarea>
</cflayout>
I've set up a left area with both an initial size, a max size, and set it so that it can be collapsed. This is how the layout is rendered:
Now you may have noticed that my demo code created a menu in the left hand side. What happens when you put a real link in? It may not be what you expect. If you use this:
<a href="item1.cfm">Link One</a><br />
The contents of item1.cfm will actually load in the entire window. Most likely that isn't what you want. There is the new AjaxLink function:
<a href="#ajaxLink('item1.cfm')#">Link One</a><br />
But this simply keeps the link inside the layout area (the left hand menu). Luckily there is a nice API we can use with our Ajax UI controls. One of them is the ColdFusion.navigate function. It lets you take a layoutarea and load in another URL. For our left hand menu items to really work, they would need to look like so:
<a href="javaScript:ColdFusion.navigate('center2.cfm','center')">Link One</a><br />
In this example, the first value passed to navigate is the URL. The second value is the name of the layoutarea. For this to work, I changed my center area to this:
<cflayoutarea position="center" name="center">
Ok, so before we wrap up - imagine the left hand menu having a "Home" link. We would use it to return to the main welcome page, or in our nice new shiny Ajax app, the content we saw in the center when the page first loaded. How can we do that? Well obviously we can use the ColdFusion.navigate function again, but remember our original code looked like this:
<cflayoutarea position="top" title="Top Layout Area">
This is the top layout area.
</cflayoutarea>
In order to restore this text again, we can simply move it to a file, lets say center.cfm, and then we can update our layoutarea like so:
<cflayoutarea position="center" source="center.cfm" name="center"/>
I've added the source attribute which simply tells ColdFusion to load the data via an Ajax-based request.
Any questions?