Testing with BoxLang

One of the fun things about immersing myself in BoxLang these past few months is my expose to other products from Ortus. Most recently, I've been doing some contracting with a client that makes use of ColdBox, which for my non-CFML readers out there is probably the most well known, and probably most popular, framework for building enterprise web applications with ColdFusion. As part of that work, I've been integrating TestBox, a testing and mocking framework that works well with ColdBox, but also (somewhat recently, I think a month or so now), supports BoxLang as well. For the most part, "it just works", but as I was new to it, I did run into a few small issues I thought I'd share a simple walkthrough of how to get started.
My "App"
Can you see the giant "air quotes" up there? By "app", what I mean is I created the simplest possible BoxLang web app I could think of. I gave it an Application.bx file that just had a name:
class {
	this.name = "tbtest0A";
}
An index.bxm with just a hello message:
<bx:output>
Hello World, #now()#
</bx:output>
And then a class that I wanted to build tests for, services/catService.bx:
class {

	public function getCats() {
		return [
			{"name":"Luna", "gender":"female"},
			{"name":"Crackers", "gender":"male"},
		]
	}
}
Installing TestBox
If you read (and you should!) the BoxLang TestBox guide, it demonstrates how to add TestBox to your app like so:
box install testbox
The box command is CommandBox, a core CLI app for most products from Ortus, so you'll need to have that installed first. Running this will install TestBox under your application in a folder appropriately named, testbox. You can, as far as I know, completely ignore this folder.
Setting Up Your Tests
Before we go on, one quick note. The TestBox guide mentions your root application configuration and shows a sample, but there's nothing in here you need to copy. If you have an existing Application.bx file, it's fine. I can say that it's important to note that some of your settings here may be important in your test folder Application.bx I'll be getting to in a second. Things like mappings and data sources may need to be copied over. This was my experience working on the large ColdBox site and the same advice may apply here, but it's not noted in the BoxLang docs... yet. Just keep it in mind.
Create a tests folder under your application. If you look at the project structure part of the guide, it demonstrates a tests folder with multiple subdirectories to help organize all your tests:
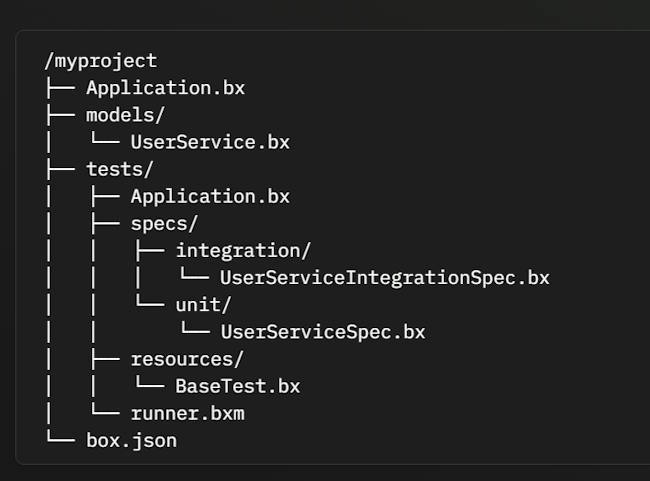
I was going to build one simple unit test for my cat server, so under the tests folder, I created specs/unit and added catServiceTest.bx. The guide has a large sample test, but here's my simple one:
class extends="testbox.system.BaseSpec"{

    function run(){

        describe( "Cat Services", () => {

            beforeEach( () => {
                variables.catService = new services.catService();
            } )

			it( "get a list of cats", () => {

				var result = catService.getCats();

				expect( result).toBeArray();
				expect(result.len()).toBeGT(0);
			} )

        } )


    }

}
The most important bit is up on top, the extends, which brings in the core TestBox class. TestBox supports BDD (Behavioral Driven Development) and TDD (Test Driven Development), which as you may know approach testing differently. I've always leaned towards the BDD style, so I followed that. Even if you've never written a test before, you can figure out what's happening here. My top level describe block is going to wrap a set of tests for my cat service code. In a real app with lots of services and such, I could imagine multiple of these. My beforeEach will run before every test in my file and in this case simply instantiates my cat service object.
My actual test, in the it block, calls the getCats method of the service and tests to see if it's both an array and has at least one result. The list of toX methods is quite extensive. It took me a little while to find the reference for this, but you can see the complete list here: https://apidocs.ortussolutions.com/testbox/6.0.1/testbox/system/Expectation.html
The next thing I did was setup the Application.bx file for my tests folder, and for that, I copied the one in the docs:
class {
    this.name                 = "My Testing Suite"
    this.sessionManagement    = true
    this.setClientCookies     = true
    this.sessionTimeout       = createTimespan( 0, 0, 15, 0 )
    this.applicationTimeout   = createTimespan( 0, 0, 15, 0 )
    this.whiteSpaceManagement = "smart"

    /**
     * --------------------------------------------------------------------------
     * Location Mappings
     * --------------------------------------------------------------------------
     * - root : Quick reference to root application
     * - testbox : Where TestBox is installed
     */
    // Create testing mapping
    this.mappings[ "/tests" ]   = getDirectoryFromPath( getCurrentTemplatePath() )
    // The root application mapping
    rootPath                    = reReplaceNoCase( this.mappings[ "/tests" ], "tests(\\|/)", "" )
    this.mappings[ "/root" ]    = rootPath
    this.mappings[ "/testbox" ] = rootPath & "testbox"

    /**
     * Fires on every test request. It builds a Virtual application for you
     *
     * @targetPage The requested page
     */
    public boolean function onRequestStart( targetPage ) {
        // Set a high timeout for long running tests
        bx:setting requestTimeout = "9999";
        // Any global request start code

        return true
    }
}
Only thing I'll really note here is the setting to allow a long request timeout which makes sense for running tests.
I then added runner.bxm, this is a web-based runner for your tests and goes in the tests folder as well. At the time I'm writing this, I had noted an odd bug in the docs that I've yet to correct because I'm unsure of what should have worked versus what I saw. For the time being, use the code I'm about to show, and note that if you read this in the future (hey, do I have a job yet? please tell me I've got a job), you can use this version:
<bx:script>
param name="url.reporter" default="simple";
param name="url.directory" default="tests.specs";
param name="url.recurse" default="true";

writeOutput(
    new testbox.system.TestBox(
        directory = url.directory,
        recurse = url.recurse,
        reporter = url.reporter
    ).run()
)
</bx:script>
The change here is to add system to the path before TestBox and semicolons on the params. If you don't care about the why, that's fine.
Ok, in theory, this is the bare minimum, so let's actually run the tests.
Testing Your Tests cuz Testing is Good - so Test
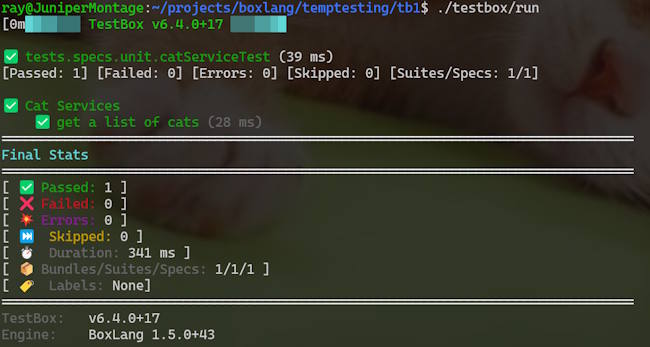
You've got two options for running tests. The first is the CLI option. This is really flexible and lets you run all your tests, or just a specific one. For me, I literally just ran ./testbox/run and got this:
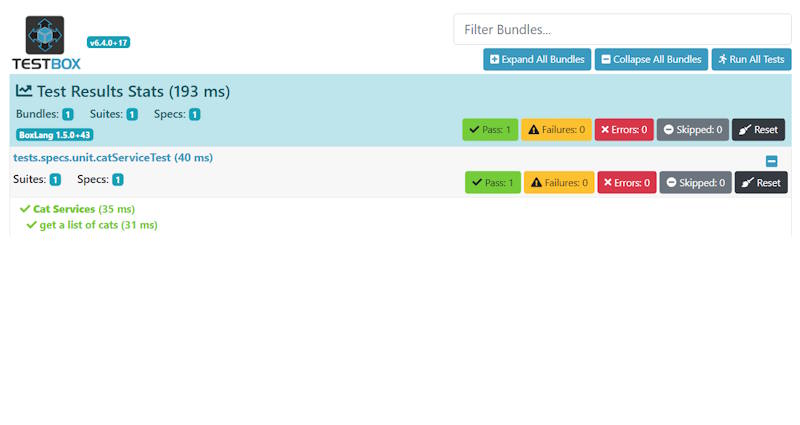
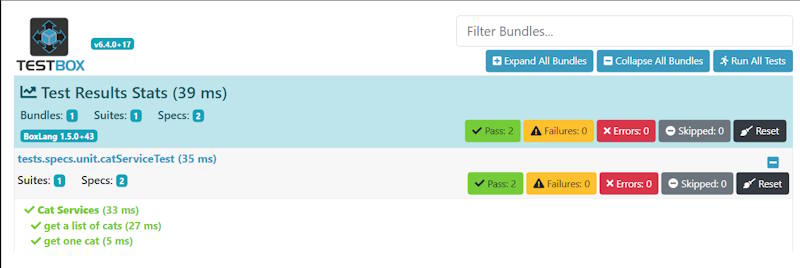
If you want a web-based version, remember we created tests/runner.bxm, so opening that up in the browser gives you a nice visual result:
Nice and simple, right? So to complete the puzzle, let's actually work on a new feature, a service method that gets one cat. I'll start off writing the test:
Here's the test I added:
it( "get one cat", () => {

	var result = catService.getCat(1);

	expect(result).toBeStruct();
	expect(result).toHaveKey("name");

} )
And yes, I know it's probably not a good test to assume an identifier of 1 for a valid result, but let's go with it. I'm testing to assume I get a structure back and that it has a name value. (I could also ensure it has gender too, or any other property.)
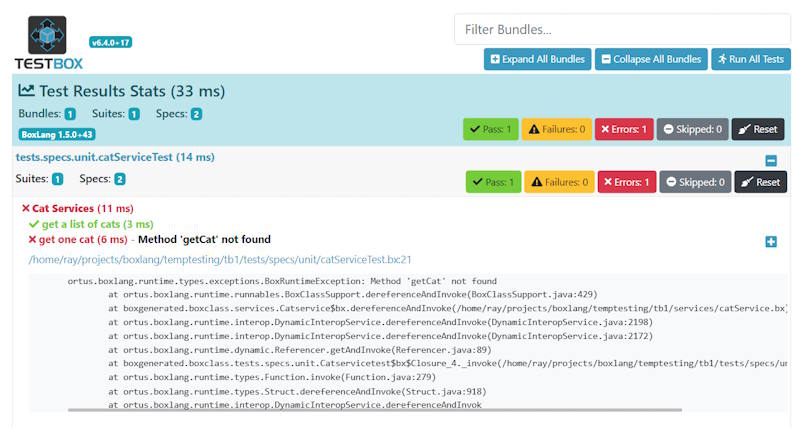
Running this immediately shows it throwing an error, as expected:
I'll fix this quickly in my cat service like so:
public function getCat(required int x) {
	return getCats()[arguments.x];
}
Yes, this is kinda ridiculous, but it does make the tests pass:
Obviously, your tests and your application will be far more complex, but all in all, the process to add TestBox is less than five minutes and the flexibility of how you can write your tests are pretty darn good. If you're a TestBox user already (in ColdFusion land), I'd love to know your experiences and thoughts on this, leave me a comment below.
Photo by Jiawei Zhao on Unsplash