Integrating Cloudinary Notifications with Pipedream

As I continue my journey into learning the awesomeness of the Cloudinary platform, today I decided to take a look at their notifications support. Cloudinary lets you specify a webhook URL that will be hit on different types of events. I whipped up a quick example of using this with Pipedream, my favorite service for processing webhooks. Here's how I did it.
Setting Up the URL
In order to use webhooks, you can either specify a Cloudinary-wide URL or specify it when using certain API methods. For my test, I began at Pipedream, created a new HTTP-triggered workflow, copied the URL, and then pasted it into my Cloudinary account settings:

Testing Events
By default, Cloudinary will fire the webhook on:
- Uploading, renaming, and deleting an asset
- Modifying metadata for an asset
- Modifying tags for an asset
- Modifying access control for an asset
- Making a new folder
Since I had my Pipedream workflow set up, I quickly tested using Cloudinary's Media Library. I made a new folder and just started dropping a few files in.

After uploading, I confirmed that I saw an event on the Pipedream side and confirmed the body matched what Cloudinary documented as part of their payload.

Cool! Now let's build on it...
Verifying Events
The Cloudinary docs suggest that you validate the webhook to ensure it really came from them. This is a mixture of checking various headers and the body and such, but honestly, their SDK makes this easy... for the most part. So here's their simple Node.js example:
cloudinary.utils.verifyNotificationSignature(body, timestamp, signature, valid_for)
This made sense, but I wasn't sure how to handle valid_for. I could absolutely tell what it meant, "If the webhook was sent at time X, it's only valid within a time range Y", but I was not able to find documentation on this argument. I ended up going to the GitHub repo for the SDK and finding it here:
It's in seconds, and it defaults to 7200, so I don't need to bother setting it. I added this to my workflow as a new code step with the following logic:
import { v2 as cloudinary } from 'cloudinary';

cloudinary.config({
  cloud_name: process.env.CLOUDINARY_CLOUD_NAME,
  api_key: process.env.CLOUDINARY_API_KEY,
  api_secret: process.env.CLOUDINARY_API_SECRET,
  secure: true
});

export default defineComponent({
  async run({ steps, $ }) {

    let verificationResult = cloudinary.utils.verifyNotificationSignature(
        JSON.stringify(steps.trigger.event.body),
        steps.trigger.event.headers['x-cld-timestamp'],
        steps.trigger.event.headers['x-cld-signature']);

    if(!verificationResult) return $.flow.exit("Cloudinary verification failed.");

  },
})
Outside of being unsure about the time, two other things tripped me. First, Pipedream lowercases HTTP headers. Notice in the sample above I'm using the lowercase version of the headers Cloudinary sends. (FYI, you can get the raw headers if you want.) Secondly, the method wants a JSON version of the body. Pipedream automatically parses it to data which is certainly what I'd want most of the time, but in this case, I had to transform it back to JSON.
An Example
A basic Pipedream workflow would need the HTTP trigger and the verification step, outside of that you would do... well whatever makes sense. I decided on a workflow that would:
- check to see if the event was an upload
- send me an email with a copy of the picture
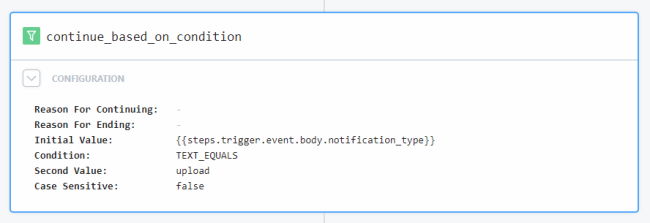
Let's tackle the first one by using a Filter step that continues if a condition is true. We want to check the notification_type value of the body sent to the workflow and want to continue when it's set to upload. Here's the Filter step I used:
As a reminder, I could have done this in a code step. Heck, I could have done it in the verification step too. But I like my workflows to be descriptive, clear of purpose, and use the built-in stuff, like Filter, whenever possible.
You can quote me on this - great tools adapt to your preference and don't force you to do things only one way.
Next, I added a step to create my HTML string. This was slightly complex as I used the Cloudinary SDK again to create a thumbnail of the image that was just uploaded. Here's the entire step:
import { v2 as cloudinary } from 'cloudinary';

cloudinary.config({
  cloud_name: process.env.CLOUDINARY_CLOUD_NAME,
  api_key: process.env.CLOUDINARY_API_KEY,
  api_secret: process.env.CLOUDINARY_API_SECRET,
  secure: true
});

// temp:
console.log('cloud name', process.env.CLOUDINARY_CLOUD_NAME);
export default defineComponent({
  async run({ steps, $ }) {

    let thumb = cloudinary.image(steps.trigger.event.body.public_id, {
      width:"200",
      height:"200",
      crop:"fit"
    });

    let body = `
    <h1>New Image Upload</h1>
    <p>
    A new image has been uploaded to your Cloudinary library. You can see the image below:
    </p>
    <p>
    <a href="${steps.trigger.event.body.url}">${thumb}</a>
    </p>
    `;

    return body;

  },
})
Finally, I added the built-in Pipedream step that emails you. I say this every single time I blog, but I used the same value for the text body of the email as HTML and you should not do that in production.

And here's the final result:

Want to try this yourself? You can make a copy here: https://pipedream.com/new?h=tch_3brfvn
Enjoy, and as always, let me know what you think.
Photo by Prateek Katyal on Unsplash