Using Pipedream to Proxy Other APIs

One of the first things that intrigued me about serverless, and honestly it's not really that novel, is the ability to build proxies to other APIs. So for example, imagine a cool API that requires authentication of some sort to use, like an API key. If you use this in client-side JavaScript, anyone can look at your code and get your key. Better services let you lock a key to a domain, but if you don't have that option, then a simple use of serverless is to simply give you an endpoint that makes the call to the API with your key.
People looking at your code see a URL like so, mydomain.com/api/getweather, and your code simply makes a call to protectedservice.com/api/getweather?key=secretkey. Of course, building a proxy like this provides other benefits as well. Many years ago I had need of an API that returned a rather large set of data. In that large set of data, I literally needed one value. So my serverless proxy hit the remote API (with credentials) and transformed the result to a much smaller packet.
While Pipedream is really freaking powerful for building workflows, you can use it for simple purposes like this as well. Let's walk through the process. My assumption is that you have a Pipedream account, but if not, it's quick and easy to sign up for one before you continue reading. (But please come back of course!)
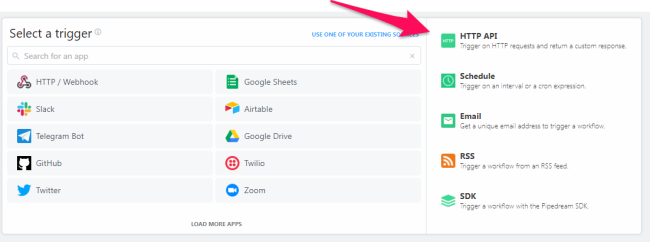
To begin, create a new Workflow and select the HTTP API trigger. This is how you create a Pipedream workflow that can be executed via a URL call:
Next, you need to add a new action, Run Node.js code, this gives you a step where you can write any code you want. At this point, the exact code depends on your remote API. It may require authentication via a header. It may require complex parameters and the such. Also, Node provides multiple different ways of making HTTP calls. Even Pipedream itself has a baked in action for hitting a remote URL. To keep things simple (and, being biased to my preference as I'm writing this), I'll use node-fetch.
async (event, steps) => {
	const fetch = require('node-fetch');
	const key = 1;

	let resp = await fetch(`https://raymondcamden.com/.netlify/functions/get-cats?key=${key}`);
	let data = await resp.json();

	await $respond({
		status:200,
		body: data
	})
}
The endpoint in this example, a get-cats function on my blog, doesn't actually require authentication, but it's a quick and simple API to hit. The key here is hard coded to a simple value - we'll return to that in a moment. Here's how the complete workflow looks in Pipedream:

You can hit this now at: https://enm7s7e1ezjcufu.m.pipedream.net/
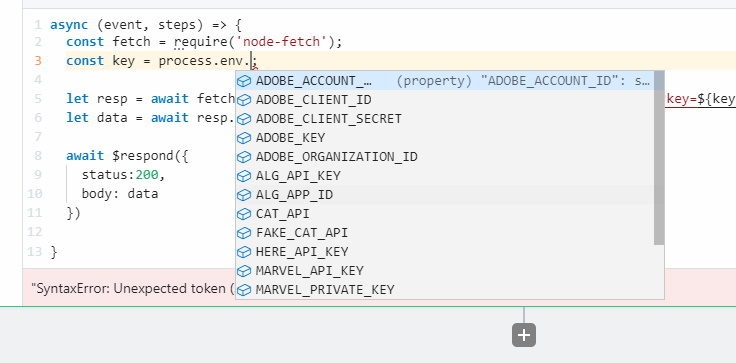
Ok, so far so good, but let's do a quick change. While our Pipedream workflows are private by default, we may want to share it with others. Having the key hard coded in there isn't a good idea. Also, we may build multiple different workflows using that remote API. The quickest way to correct this is to add a Pipedream environment variable. If you click the "Settings" link in the left hand column of the Pipedream fashboard, you'll land on a page where you can select "Environment Variables". On that page you can add, edit, and delete any number of environment variables. And heck, the help text here describes the exact thing we're doing!
For example, if you need to fetch data from an API that requires an API key, you can create an environment variable named API_KEY and reference its value in a code cell like so:
Click on "New Environment Variable" and give it a name and value. Since this is account-wide, you normally want to use a specific name of some sort. Since we're hitting my fake little cat API, I'll name it "FAKE_CAT_API":

What's cool is as soon as you save it, it's available in intellisense in the editor:
While we're here, let's go ahead and make one change to demonstrate transforming the response. My fake API returns an array of cat objects that contain name, age, breed, and gender. What if we know we don't need breed or gender? We can map that out before we return it like so:
async (event, steps) => {
	const fetch = require('node-fetch');
	const key = 1;

	let resp = await fetch(`https://raymondcamden.com/.netlify/functions/get-cats?key=${key}`);
	let data = await resp.json();

	data = data.map(c => {
		return { name: c.name, age: c.age };
	});

	await $respond({
		status:200,
		body: data
	})
}
Now you have an API proxy that hides the key from your front-end code and also reduces the size of the data to exactly what you need. You basically "recreated" the other API to better fit your needs, which is cool.
Finally - your API may have parameters that you want your front end code to support. You can make use of those in a variety of ways depending on how you want to call your Pipedream wortkflow. So for example, if you want to use the query string, you can access those values via steps.trigger.event.query. If ?name=foo is passed, then steps.trigger.event.query.name would be foo. You could then pass this on to the remote API.
Or - and here's the cool part - if the remote API doesn't support that kind of logic - yours can! So my cat API does not suport filtering by name. That's ok - I used Pipedream to fix it:
async (event, steps) => {
	const fetch = require('node-fetch');
	const key = 1;

	let resp = await fetch(`https://raymondcamden.com/.netlify/functions/get-cats?key=${key}`);
	let data = await resp.json();

	data = data.map(c => {
		return { name: c.name, age: c.age };
	});

	if(steps.trigger.event.query.name) {
		data = data.filter(c => c.name.toLowerCase().indexOf(steps.trigger.event.query.name) >= 0);
	}

	await $respond({
		status:200,
		body: data
	})
}
Now I can hit https://enm7s7e1ezjcufu.m.pipedream.net/?name=p and return cats with p in the name. At this point I've now used Pipedream to:
- hide the key
- make the response smaller
- add a filter feature the original API didn't have
If you want, you see the last version of my workflow here: https://pipedream.com/@raymondcamden/hiding-api-keys-in-pipedream-for-blog-p_V9C9oQx You can also then fork it and use it yourself. Enjoy!
Photo by Jari Hytönen on Unsplash