Adding an Email Subscription to Your Jamstack Site

Before I begin, a quick note. While what I've built seems to be working ok, I'm still tweaking things a bit so please forgive me if anything doesn't work exactly right. Be sure to reach out and let me know if you run into any issues. Alright, so the topic of this post is how you can incorporate an email subscription service into your Jamstack site, specifically a blog. While most blogs, including mine, offer an RSS feed, I've not been a big user of RSS readers myself. I like the idea, it just hasn't worked well for me as I forget to run them, fall behind and then feel like it's a chore to go through my various subscriptions. Instead, I prefer signing up for an email when a new post is released. Not every blog has that service and in cases like that I've used services like IFTTT to create my own subscription. I decided to take a look into what it would take to add such a service to my own blog.
I was spurred on by the recent news that Google was removing email subscriptions from FeedBurner. I used FeedBurner in the past and it was a pretty cool service, giving you stats on your RSS subscribers and also providing a free email subscription service. But with the email service going away, that's no longer an option.
To build a replacement, I decided to use MailChimp. Brian and I used MailChimp for our music newsletter (which sadly is a victem of COVID and not having enough time) and I knew they had a good developer API. My initial plan (which quickly changed) was this:
- Set up my account.
- Use their developer API and a serverless function to let people subscribe from my blog. I did this for our music newsletter and described it in detail here: Using the MailChimp API with Netlify Serverless Functions
- Create a service that would run on a schedule to check my RSS feed, find items released in the past 24 hours, and if any, create an email and use the MailChimp API to send that email.
It turns out step three ended up being somewhat of an issue and I had to pivot, but let's wait to tackle that. I signed up at MailChimp for their free tier which seems pretty reasonable. According to their pricing page, the free tier includes two thousand contacts and one audience. (In my understanding, you can think of an audience as a mail list.) If I hit two thousand subscribes I'll do a happy dance. The next tier is ten bucks a month and supports fifty thousand contacts.
Now - a quick note. I was curious about the specifics of the plans this morning and checked the prices from my admin dashboard. While the prices were the same there, the numbers of contacts supported were quite different. In fact, it seemed to imply that going from free to paid results in 75% less contacts! I'm guessing that I'm either misreading things or they have old UI there. You can check my tweets to them to see if they responded. (Quick note: I did some more digging and I believe the issue is this. The first paid tier lets you have up to 50K contacts and you pay a sliding scale with the number of contacts starting at 500 for ten bucks a month. I don't get why the first paid tier would reduce your total contacts, that seems... weird.)
Alright, so I set up my account on the free tier and turned towards building a serverless function to let people add themselves to the account. I won't go into much detail there as I documented it in my earlier blog post, I'll just point out that finding your list ID can be a bit of a pain. This article from MailChimp helps: Find Your Audience ID.
Once I had that, I created my serverless function using the Netlify CLI and called it newsletter-signup because I am so creative at naming things. Here's my code:
const axios = require('axios');
var crypto = require('crypto');

const listId = 'f42e299fb2';
const apiRoot = `https://us1.api.mailchimp.com/3.0/lists/${listId}/members/`;

const handler = async (event) => {
	try {

		const email = event.queryStringParameters.email;
		if (!email) {
			return {
				statusCode: 500,
				body: 'email query paramter required'
			};
		}

		// https://gist.github.com/kitek/1579117
		let emailhash = crypto.createHash('md5').update(email).digest('hex');

		return axios({
				method: 'put',
				url: apiRoot + emailhash,
				data: {
					email_address: email,
					status: 'subscribed',
					merge_fields: {
						tag:'blog'
					}
				},
				auth: {
					'username': 'anythingreally',
					'password': process.env.MC_API
				}
			}).then(res => {
				return {
					statusCode: 200,
					body: JSON.stringify(res.data)
				}
			})
			.catch(err => {
				console.log('returning from here', err.response.data.detail);
				return {
					statusCode: 500,
					body: JSON.stringify(err.response.data)
				};
			});

	} catch (error) {
		return { statusCode: 500, body: error.toString() }
	}
}

module.exports = { handler }
There really isn't much there. I'll point out that you can add an existing email to a list and the API won't complain. That made testing easy as I just kept adding my own email address. I also used merge_fields to tag the user as coming from my blog, but I'm not actually doing anything with that, at least not yet. Note that right now, on the free tier, you've got one audience, or list, so I'm basically saying my own personal MailChimp account is only being used for my blog which is fine, but if you plan on doing more, you'll need to update and ensure you use new list IDs for your future work.
Once done and tested, I then thought about how to add this to the site. I want to thank Brian Rinaldi for this help here as he had some great suggestions. I ended up adding it in two places. First, in the top nav. It points to a subscribe form that uses a simple Vue.js app to handle posting the email address. As it uses Vue and I needed to escape it's tokens to not intefere with Liquid and Eleventy, showing the code here would be a bit awkward. So instead I'll use a Gist. As a reminder, the code can be found up on my GitHub repo for the site.
Along with that, I added a new form to the end of every post (just scroll down and be sure to scroll back ;) with an inline form. For that I used vanilla JS because it's my blog and I can mix things up a bit!
function doSubscriptionForm() {
    const SUBSCRIBE_API = '/.netlify/functions/newsletter-signup?email=';
    const subEmail = document.querySelector('#subEmail');
    const subButton = document.querySelector('#subButton');
    const subStatus = document.querySelector('#subStatus');

    subButton.addEventListener('click', () => {
        const email = subEmail.value;
        if(!email) return;
        console.log('add '+email);
        subButton.disabled = true;
        subStatus.innerHTML = 'Attempting to subscribe you...';
        fetch(SUBSCRIBE_API + email)
        .then(res => {
            return res.json()
        })
        .then(res => {
            console.log('status',res.status);
            if(res.status === 'subscribed') {
                subStatus.innerHTML = 'You have been subscribed!';
            } else if(res.status === 400) {
                subStatus.innerHTML = `There was an error: ${res.detail}`;
            }
            subButton.disabled = false;
        })
        .catch(e => {
            console.log('error result', e);
        });

    });
}
It's virtually the same thing. I figure providng both options will be helpful as folks probably don't notice the top navigation that much.
Alright, so that was signup and relatively quick to do. I then started looking into actually sending email. I wrote a quick serverless function that got my RSS feed and determined if there were any recent blog posts. Then I hit a brick wall. From what I could tell, there wasn't a simple way to just send email to the list. To be clear, I believe you can, but I struggled with how to do it. MailChimp offers a 'transactional email' service for custom messages and the like, but I really just wanted to pass some text and have it sent to the audience.
I asked for help on Twitter and Stephen Bell shared an awesome fact, MailChimp has a RSS to Mail feature! You literally just turn it on, set up a few options, and you're good to go. Here's how that looks.
First, you enable it.

Next, you give it a campaign name. FYI the "business name" there is what I used for my second test account just for screen shots.

On the next screen, you configure the RSS feed and schedule.

Now this brings up a very important detail. When working on my blog, my post templates don't normally include a time. Here's an example:
---
layout: post
title: "Building Table Sorting and Pagination in Vue.js - with Async Data"
date: "2020-02-01"
categories: ["javascript"]
tags: ["vuejs"]
banner_image: /images/banners/hannes-egler-369155.jpg
permalink: /2020/02/01/building-table-sorting-and-pagination-in-vuejs-with-async-data
description: Paging and sorting remote data with Vue.js
---
Notice how it's just year, month, and date? That was reflected in my RSS feed as well. Here's an example:
<pubDate>Sat, 27 Mar 2021 00:00:00 +0000</pubDate>
This created an interesting issue. I released a post on Friday but the time was midnight. When MailChimp ran it's daily check on Saturday at some time in the morning (I believe I picked 11AM), it was more than 24 hours past and therefore didn't find the new post. To correct this, I started including time values in my most recent posts, for example, this one:
date: "2021-05-01T18:00:00"
The time was arbitrary, but felt safe. My blog doesn't hide "future" posts so even though it isn't that time here yet it shows up just fine and I'm fine with that. Just keep this in mind!
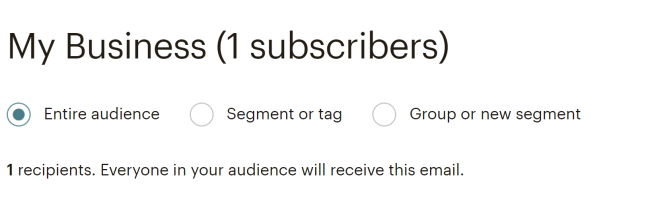
The next screen lets you specify an audience (you will only have one on the free tier) or filter it down to a segment or tag. I kept it simple and just used my audience.
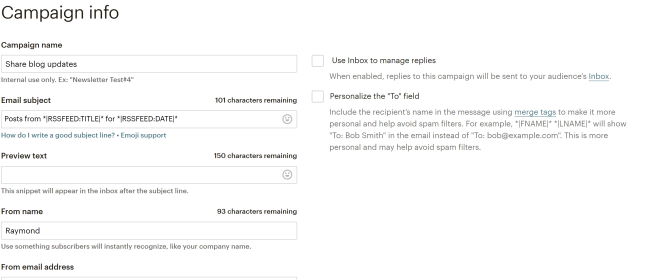
The next screen lets you tweak quite a bit (the screen shot only shows about half the options). For me, all I did here was tweak the 'From name' option but you may want to do more.
The next screen asks you to pick a template. This is a bit overwhelming but I think the best option is the 1 column option under Basic. Now here's where things get a bit complex. The template is not setup to actually work with RSS. I'm not sure why MailChimp doesn't have one built for you (maybe it does and I couldn't find it), but their template editor isn't too hard to use once you get into it. By default you will see something like this:
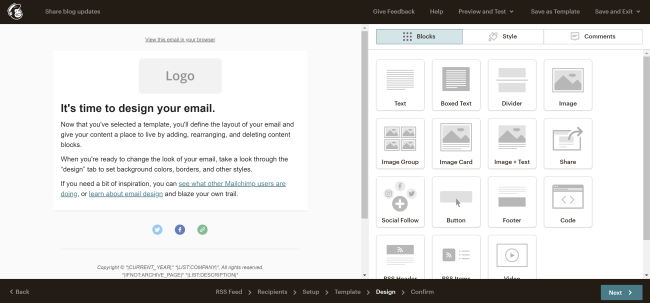
As you mouse over the template, each part lets you click to edit, remove, or add new bits. That block, "It's time to design your email", should be removed or edits, and MailChimp will tell you if you don't. You can click to edit it and give it a nicer title and text:
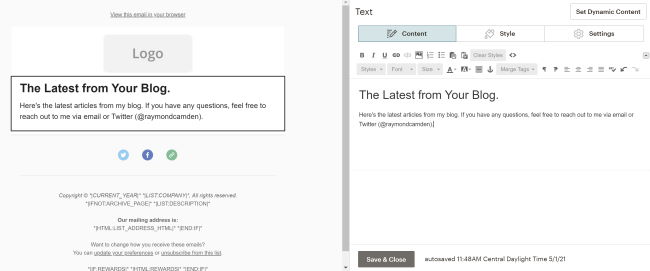
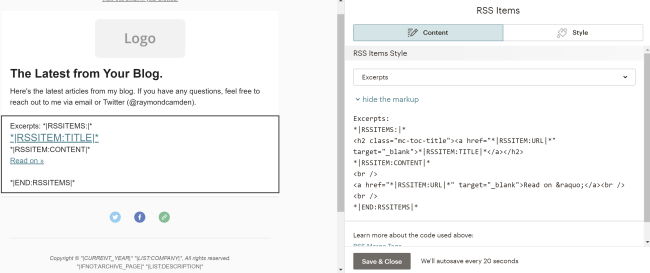
Next you need to add the RSS information. In the list of blocks to the right you'll see two. "RSS Header" uses the information from your feed to dynamically add the title and description. I did not use this as I liked my text block which included how to reach out to me. Instead I dragged in the "RSS Items" block. You can, if you choose, edit the layout here. For example, I went to custom so I could remove the word "Excerts" from the text. You could tweak more here if you want.
The last thing I'll point out is the "Social Follow" block at the bottom. I edited that to remove Facebook and changed the URLs for Twitter and Website to point to my Twitter account and site.
You can continue to tweak as you see fit of course. As I said, the editor is pretty powerful. Hit next and you can confirm everything is ok. Before you continue, be sure to use the "Preview and Test" function on the top right. You can enter your email address and it will fire off an email to it.

What's cool is that it automatically uses your most recent blog post as content even if it's old. I missed this test feature at first and I was so happy to find it. The last thing to do is click "Start RSS" at the bottom.

And that's it! As I said, I just launched this so I'm not 100% sure how well it's going to work, but sign up and let me know what you think.