
Vue has great support for working with forms. This is heavily documented in the Form Input Bindings section. I wanted to build my own demo/set of examples based on this as a way of exploring the different types of inputs and how Vue works with them. In order to do this, I built a demo that covered every single type of form field possible. (As far as I know, let me know what I forgot.) For each I tested setting an initial value and outputting the bound value in case it looked different than what the field displayed, input[type=color] is a great example of this.
If you don't want to read my long winded text, you can jump right to the CodePen here: https://codepen.io/cfjedimaster/pen/vYEMgjV?editors=1011
Ok, let's get started! Please note some of these are boring, i.e. they work as expected with no weirdness.
input[type=text] #
The simplest and easiest of the fields, and what the "fancy" fields (like type=color) turn into when run on older browsers. I tested with this markup:
<p>
<label for="text1">text:</label>
<input v-model="text1" id="text1" type="text">
</p>

<p>
<label for="text2">text (maxlength=5):</label>
<input v-model="text2" id="text2" type="text" maxlength=5>
</p>
And this data:
text1:'Ray',
text2:'Raymond Camden',
Notice the second field makes use of maxlength. On initial display, both work as expected, but in the second one you can only delete characters, not add them, until the length is less than five.
input[type=button] #
I used this markup:
<p>
<label for="button1">button:</label>
<input v-model="button1" id="button1" type="button">
</p>
and this data:
button1:'button1',
And it just renders a button where the label is the model value.

input[type=checkbox] #
Ok, this is a fun one. Checkboxes allow you to specify zero, one, or multiple items. I used this markup to dynamically render the checkboxes:
<p>
checkbox:<br/>
<span v-for="(cbv,idx) in checkbox1Values">
<input v-model="checkbox1" :value="cbv" type="checkbox"
		:id="'checkbox1'+idx"/> <label :for="'checkbox1'+idx">{{ cbv }}</label><br/>
</span>
</p>
Here is the data:
checkbox1: ['red', 'blue'],
checkbox1Values: ['red', 'blue', 'green', 'orange' ],
A few things to note here. I've got N inputs based on the total number of items in the array. Each one has a specific value, but the v-model points to the selected value I've defined. Also note when I iterate I include the loop index, this lets me specify a dynamic ID value for each and use a label to make it easier to use.
The default value, if you want to specify it, is an array.
input[type=color] #
The first one that may not be supported in your browser, it worked just fine in the shiny new Microsoft Edge. Here's the layout:
<p>
<label for="color1">color:</label>
<input v-model="color1" id="color1" type="color">
</p>
and here is the data:
color1:'#cc8800',
This is the first control where, by itself, you can't see the real value:

When I first tried this, I attempted to set color1 to a named color, but that isn't supported, it must be an RBG value in hex. This is - of course - documented over at MDN.
The date inputs #
To make things a bit easier, let's consider the date related field types: date, datetime-local, month, time, and week. Altogether, their markup:
<p>
<label for="date1">date:</label>
<input v-model="date1" id="date1" type="date">
</p>

<p>
<label for="datetimelocal1">datetime-local:</label>
<input v-model="datetimelocal1" id="datetimelocal1" type="datetime-local">
</p>

<p>
<label for="month1">month:</label>
<input v-model="month1" id="month1" type="month">
</p>

<p>
<label for="time1">time:</label>
<input v-model="time1" id="time1" type="time">
</p>

<p>
<label for="week1">week:</label>
<input v-model="week1" id="week1" type="week">
</p>
All in all, there's nothing special about any of these markup wise, but UI wise they all render somewhat differently across different browsers (and not at all in Safari because of course not).
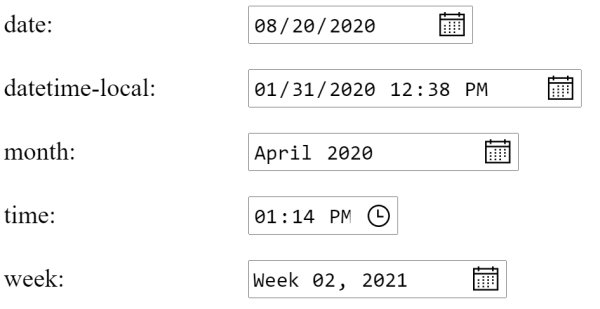
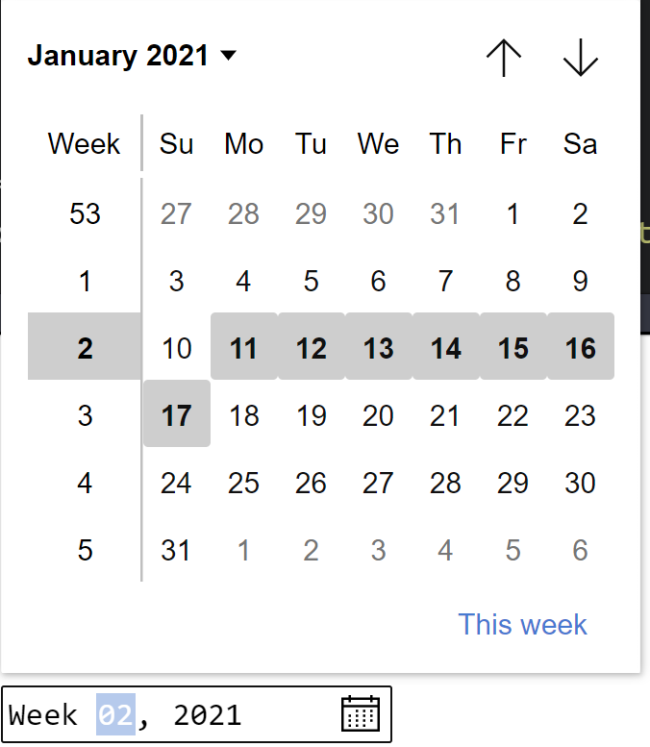
Some work as expected, like date opening up a calendar (again, in Microsoft Edge), but then it gets more complex from there. Week, for example, shows this:
Each of these had slightly different ways of specifying initial values:
date1:'2020-08-20',
datetimelocal1:'2020-01-31T12:38:00.000',
month1:'2020-04',
time1:'13:14:00.000',
week1:'2021-W02',
I had to guess at some of these. I'd specify a blank value, set the value, and then check my debug output. (I may have forgot to mention, but at the bottom of my markup I've got a debug region where I output every value.) Week, especially, was surprising.
input[type=email] #
Absolutely nothing special about this - here's the markup:
<p>
<label for="email1">email:</label>
<input v-model="email1" id="email1" type="email">
</p>
and the data:
email1:'raymondcamden@gmail.com',
input[type=file] #
Here's a fun one. First note that form fields are readonly, so doing this won't be possible:
<p>
<label for="file11">file:</label>
<input v-model="file1" id="file1" type="file">
</p>
And:
file1:'c:\\autoexec.bat',
In fact, Vue screams about it in the console:
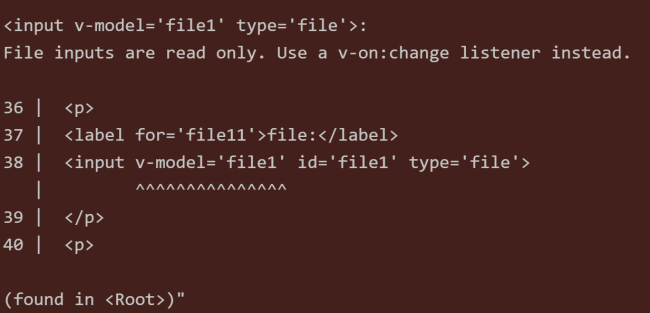
What's cool is that they tell you exactly how to fix it:
<input @change="setFile" id="file1" type="file">
This can then be tied to a method:
methods:{
	setFile(e) {
		console.log('selected file(s)', e.target.files);
		// grab the file name and do something with it
	}
}
This provides you access to information about the files allowing you to do fancy things, like figuring the size of images or doing client-side validation of files.
input[type=hidden] #
Works as expected, hidden from the user, nothing to see here, carry on.
<p>
<label for="hidden1">hidden:</label>
<input v-model="hidden1" id="hidden1" type="hidden">
</p>
hidden1:'you can\'t see me...',
input[type=image] #
Also nothing special here. I've never used this one in production before but I guess folks have used it.
<p>
<label for="image1">picture:</label>
<input :src="image1" id="image1" type="image">
</p>
My data was a URL path to the image:
image1:'http://placekitten.com/g/200/300',
In case you're curious it is acts like a submit button.
input[type=number] #
Again, nothing really special... at first. So consider this markup:
<p>
<label for="number1">number:</label>
<input v-model="number1" id="number1" type="number">
</p>
And this data:
number1:6,
So if you don't modify the value, what's actually there in the DOM?
6? Nope.
"6"
Pat yourself on the back if you knew this. I know this. Of course I do. I still manage to forget about 90% of the time. Vue provides a dang nice way to handle this though. Just add a .number modifier:
<input v-model.number="number1" id="number1" type="number">
input[type=password] #
Again, nothing special. Take this markup:
<p>
<label for="password1">password:</label>
<input v-model="password1" id="password1" type="password">
</p>
And this code:
password1:'kyloren',
And you get a password field where the value is hidden. Don't forget though that you or I can go into devtools and change the field type to text to see the value.
input[type=radio] #
Another one with multiple items, but this one only takes one value, not 0 or more.
<p>
radio:<br/>
<span v-for="(rbv,idx) in radio1Values">
<input v-model="radio1" :value="rbv" type="radio"
		:id="'radio1'+idx"/> <label :for="'radio1'+idx">{{ rbv }}</label><br/>
</span>
</p>
And here is the data:
radio1: 'beer',
radio1Values: ['pizza', 'donuts', 'beer', 'hamburgers' ],
Notice that the selected value is not an array but one value.
input[type=range] #
First the markup:
<p>
<label for="range1">range:</label>
<input v-model="range1" id="range1" type="range" min="1" max="10">
</p>
And the value:
range1: 6,
Remember that the browser will not display any numbers with this control:

You could use the <output> tag to handle this but it's probably easier to just add {{ range1 }} to the markup.
input[type=search] #
This is mainly the same as a text field with the addition of a little X (or some other UI) to clear the data immediately. Here's the markup:
<p>
<label for="search1">search:</label>
<input v-model="search1" id="search1" type="search">
</p>
and the data:
search1:'search text',
Still with me? We're almost done.
input[type=submit] #
Another boring one. This time binding the value just sets the value on the button.
<p>
<label for="submit1">submit:</label>
<input v-model="submit1" id="submit1" type="submit">
</p>
submit1: 'Submit or Die'
input[type=tel] #
This one primarily works on mobile. It should fire up a keyboard better suited for entering phone numbers. On desktop it does nothing special.
Markup:
<p>
<label for="tel1">tel:</label>
<input v-model="tel1" id="tel1" type="tel">
</p>
And data:
tel1: '555-555-5555',
input[type=url] #
And finally, the URL field. Looks the same but will validate differently.
<p>
<label for="url1">url:</label>
<input v-model="url1" id="url1" type="url">
</p>
And code:
url1:'https://www.raymondcamden.com',
select #
Did I say finally? Nope, not done yet. Here's how select works. First, the markup:
<p>
select:<br/>
<select v-model="select1">
	<option v-for="sel in select1Values">{{ sel }}</option>
</select>
</p>
And the values:
select1: 'hbo',
select1Values: ['cinemax', 'showtime', 'hbo', 'cbs' ],
A regular select lets you pick one option so the value specified is just a simple string.
When using the multiple option, things change a tiny bit:
<p>
select multiple:<br/>
<select v-model="select2" multiple>
	<option v-for="sel in select1Values">{{ sel }}</option>
</select>
</p>
And the values:
select2: ['showtime', 'cbs'],
select2Values: ['cinemax', 'showtime', 'hbo', 'cbs' ],
The big change here is using an array to set (and work with) the selected values.
Almost done - honest!
textarea #
First, the markup:
<p>
<label for="textarea1">textarea</label>
<textarea v-model="textarea1" id="textarea1"></textarea>
</p>
And then the value:
textarea1:'This is my text area\nIt is better than yours...'
Notice that you do not have to provide a value inside the textarea block. I actually forgot and had this originally: <textarea v-model="textarea1" id="textarea1">{{textarea1}}</textarea>
Wrap Up #
For the most part, there weren't many surprises here, but I know I'm happy to have an example of everything in one place. You can run, and fork, the full example here:
See the Pen Vue Form Examples by Raymond Camden (@cfjedimaster) on CodePen.
Header photo by Erol Ahmed on Unsplash